脆弱性診断ツールVulsを使う
はじめに
脆弱性検査ツールには有償のもの、無償のもの様々なものが存在する。すべての脆弱性の検知は無理なので適切な脆弱性検査ツールを用いることがシステムの脆弱性をなくすうえで重要である。
ではどういった条件の時にどのツールを使えばいいのかは調べなければわからない。今回はVulsを調べる
Vulsとは
Vulsインストール
IPAがVulsに関してはインストールと使い方含め資料を出しています。 https://www.ipa.go.jp/files/000071584.pdf
今回はそれをなぞった記事となります。少しだけコマンドが変わってる、バージョンが新しいとかありますが問題なんてほとんどありません。
Vulsインストール手動編
事前準備
ここではvulsを使うために必要なパッケージ等を入手します。
vulsを使うためにはsqlite, gcc, git, make, wget, goになります。
またvulsを使うユーザも作成します。
vulsを使うユーザの作成
# useradd vuls -d /home/vuls -s /bin/bash
# passwd vuls
# visudo
+ vuls ALL=(ALL) ALL
# su vuls
$ cd ~/
vulsをインストールするために必要なパッケージの入手
goはwgetでバイナリをとってきます。
バージョンに関しては2019/08/08時では1.12.7が最新
$ sudo yum -y install sqlite gcc git make wget yum-utils
$ wget https://dl.google.com/go/go1.12.7.linux-amd64.tar.gz
$ sudo tar -C /usr/local -xzf go1.12.7.linux-amd64.tar.gz
$ mkdir $HOME/go
$ sudo vi /etc/profile.d/goenv.sh
+ export GOROOT=/usr/local/go
+ export GOPATH=$HOME/go
+ export PATH=$PATH:$GOROOT/bin:$GOPATH/bin
$ source /etc/profile.d/goenv.sh
vulsを使うのに必要なソフトウェアのインストール
vulsを使うにはgo-cve-dictionary, goval-dictionary, gost, go-exploitdb, VulsRepoが必要となります。それぞれがどういうものかは下記の表に示す通りです。
| ソフトウェア | 内容 |
|---|---|
| go-cve-dictionary | vulsで使う脆弱性データベースから取得して管理する |
| goval-dictionary | OSのOVAL情報を管理する |
| gost | RedHat, Debian等の脆弱性情報を収集するツール |
| go-exploitdb | offensive securityに集められているexploitデータベースを取得する |
go-cve-dictionaryのインストールと情報取得
$ sudo mkdir /var/log/vuls
$ sudo chown vuls /var/log/vuls
$ sudo chmod 700 /var/log/vuls
$ mkdir -p $GOPATH/src/github.com/kotakanbe
$ cd $GOPATH/src/github.com/kotakanbe
$ git clone https://github.com/kotakanbe/go-cve-dictionary.git
$ cd go-cve-dictionary
$ make install
$ go-cve-dictionary -v
ちなみにnvdのほうは2001以前は存在しないと返される。環境によっては時間がかかるため注意。特にnvdのほうが時間がかかる
$ for i in `seq 1998 $(date +"%Y" )`; do go-cve-dictionary fetchjvn -years $i; done
$ for i in `seq 2002 $(date +"%Y" )`; do go-cve-dictionary fetchnvd -years $i; done
goval-dictionaryのインストールと情報取得
$ mkdir -p $GOPATH/src/github.com/kotakanbe
$ cd $GOPATH/src/github.com/kotakanbe
$ git clone https://github.com/kotakanbe/goval-dictionary.git
$ cd goval-dictionary
$ make install
$ cd $GOPATH/bin
$ ls goval-dictionary
ローカルでテストするのでredhat 7のoval情報を取得しておく。
$ goval-dictionary fetch-redhat 7
gostのインストールのインストールと情報取得
$ sudo mkdir /var/log/gost
$ sudo chown vuls /var/log/gost
$ sudo chmod 700 /var/log/gost
$ mkdir $GOPATH/src/github.com/knqyf263
$ cd $GOPATH/src/github.com/knqyf263
$ git clone https://github.com/knqyf263/gost.git
$ cd gost
$ make install
$ gost -v
gostもデータを取得します
$ gost fetch redhat
exploit-dbのインストールと情報取得
$ sudo mkdir /var/log/go-exploitdb
$ sudo chown vuls /var/log/go-exploitdb
$ sudo chmod 700 /var/log/go-exploitdb
$ mkdir $GOPATH/src/github.com/mozqnet
$ cd $GOPATH/src/github.com/mozqnet
$ git clone https://github.com/mozqnet/go-exploitdb.git
$ cd go-exploitdb
$ make install
exploitdbの情報取得は下記のようにすればよいです。
IPAの資料通りにはいかない部分でした。
$ go-exploitdb fetch exploitdb
vulsのインストール
$ mkdir $GOPATH/src/github.com/future-architect
$ cd $GOPATH/src/github.com/future-architect
$ git clone https://github.com/future-architect/vuls.git
$ cd vuls
$ make install
ここまでの一連のインストールでvulsが使えるようになります。
Vulsをローカルに対して試す
vulsではconfig.tomlファイルをもとにスキャンを試します。
そのためホームディレクトリにconfig.tomlファイルを作成し対象を定めておきます。
$ cd $HOME
$ vi config.toml
[servers]

[servers.local]
host = "localhost"
port = "local"
config.tomlに記載したら後はvulsを実行するだけとなります。
実行する前にconfig.tomlとvulsの管理情報のテストをしておくと確実です。
$ vuls configtest
[Aug  9 11:59:13]  INFO [localhost] Validating config...
[Aug  9 11:59:13]  INFO [localhost] Detecting Server/Container OS...
[Aug  9 11:59:13]  INFO [localhost] Detecting OS of servers...
[Aug  9 11:59:13]  INFO [localhost] (1/1) Detected: localhost: centos 7.6.1810
[Aug  9 11:59:13]  INFO [localhost] Detecting OS of static containers...
[Aug  9 11:59:13]  INFO [localhost] Detecting OS of containers...
[Aug  9 11:59:13]  INFO [localhost] Checking Scan Modes...
[Aug  9 11:59:13]  INFO [localhost] Checking dependencies...
[Aug  9 11:59:13]  INFO [localhost] Dependencies ... Pass
[Aug  9 11:59:13]  INFO [localhost] Checking sudo settings...
[Aug  9 11:59:13]  INFO [localhost] Sudo... Pass
[Aug  9 11:59:13]  INFO [localhost] It can be scanned with fast scan mode even if warn or err messages are displayed due to lack of dependent packages or sudo settings in fast-root or deep scan mode
[Aug  9 11:59:13]  INFO [localhost] Scannable servers are below...

$ vuls scan
[Aug  9 11:57:54]  INFO [localhost] Start scanning
[Aug  9 11:57:54]  INFO [localhost] config: /home/vuls/config.toml
[Aug  9 11:57:54]  INFO [localhost] Validating config...
[Aug  9 11:57:54]  INFO [localhost] Detecting Server/Container OS...
[Aug  9 11:57:54]  INFO [localhost] Detecting OS of servers...
[Aug  9 11:57:54]  INFO [localhost] (1/1) Detected: localhost: centos 7.6.1810
[Aug  9 11:57:54]  INFO [localhost] Detecting OS of static containers...
[Aug  9 11:57:54]  INFO [localhost] Detecting OS of containers...
[Aug  9 11:57:54]  INFO [localhost] Checking Scan Modes...
[Aug  9 11:57:54]  INFO [localhost] Detecting Platforms...
[Aug  9 11:57:54]  INFO [localhost] (1/1) localhost is running on other
[Aug  9 11:57:54]  INFO [localhost] Detecting IPS identifiers...
[Aug  9 11:57:54]  INFO [localhost] (1/1) localhost has 0 IPS integration
[Aug  9 11:57:54]  INFO [localhost] Scanning vulnerabilities...
[Aug  9 11:57:54]  INFO [localhost] Scanning vulnerable OS packages...
[Aug  9 11:57:54]  INFO [localhost] Scanning in fast mode


One Line Summary
================
[Reboot Required] localhost     centos7.6.1810  351 installed, 0 updatable
Vulsのレポートを見る
実行した結果のレポートを確認します。
サマリを確認するにはvuls report -format-one-line-textと打つと確認できます。
$ vuls report -format-one-line-text
[Aug  9 12:01:51]  INFO [localhost] Validating config...
[Aug  9 12:01:51]  INFO [localhost] Loaded: /home/vuls/results/2019-08-09T11:57:54+09:00
[Aug  9 12:01:51]  INFO [localhost] Validating db config...
INFO[0000] -cvedb-type: sqlite3, -cvedb-url: , -cvedb-path: /home/vuls/cve.sqlite3
INFO[0000] -ovaldb-type: sqlite3, -ovaldb-url: , -ovaldb-path: /home/vuls/oval.sqlite3
INFO[0000] -gostdb-type: sqlite3, -gostdb-url: , -gostdb-path: /home/vuls/gost.sqlite3
INFO[0000] -exploitdb-type: sqlite3, -exploitdb-url: , -exploitdb-path: /home/vuls/go-exploitdb.sqlite3
[Aug  9 12:01:51]  WARN [localhost] --gostdb-path=/home/vuls/gost.sqlite3 is not found. If the scan target server is Debian, RHEL or  entOS, it's recommended to use gost to improve scanning accuracy. To use gost database, see https://github.com/knqyf263/gost#fetch-re hat
[Aug  9 12:01:51]  WARN [localhost] --exploitdb-path=/home/vuls/go-exploitdb.sqlite3 is not found. It's recommended to use exploit to improve scanning accuracy. To use exploit db database, see https://github.com/mozqnet/go-exploitdb
[Aug  9 12:01:51]  INFO [localhost] [Reboot Required] localhost: 0 CVEs are detected with Library
[Aug  9 12:01:51]  INFO [localhost] OVAL is fresh: redhat 7.6.1810
[Aug  9 12:01:56]  INFO [localhost] [Reboot Required] localhost: 90 CVEs are detected with OVAL
[Aug  9 12:01:56]  INFO [localhost] [Reboot Required] localhost: 0 CVEs are detected with CPE
[Aug  9 12:01:56]  INFO [localhost] [Reboot Required] localhost: 0 CVEs are detected with GitHub Security Alerts
[Aug  9 12:01:56]  INFO [localhost] [Reboot Required] localhost: 0 unfixed CVEs are detected with gost
[Aug  9 12:01:56]  INFO [localhost] Fill CVE detailed information with CVE-DB
[Aug  9 12:02:00]  INFO [localhost] Fill exploit information with Exploit-DB
[Aug  9 12:02:00]  INFO [localhost] [Reboot Required] localhost: 0 exploits are detected
[Aug  9 12:02:00]  INFO [localhost] [Reboot Required] localhost: en: 0, ja: 0 alerts are detected


One Line Summary
================
[Reboot Required] localhost     Total: 90 (High:13 Medium:64 Low:13 ?:0)        0/90 Fixed      351 installed, 0 updatable      0 exp oits    en: 0, ja: 0 alerts
最終行に見つかったのが合計90で危険度がHighなのが13, Mediumが64, Lowが13となっており、何も修正対応していないことがわかります。
vulsのスキャンをフルで確認する
スキャンした結果見つかった脆弱性のすべてのレポートは$ vuls report -format-full-textで確認できます。
一例が下のようになります。
$ vuls report -format-full-text
+----------------+----------------------------------------------------------------------------------+
| CVE-2019-3900  | UNFIXED                                                                          |
+----------------+----------------------------------------------------------------------------------+
| Max Score      | 6.8 MEDIUM (nvd)                                                                 |
| nvd            | 6.5/CVSS:3.0/AV:N/AC:L/PR:L/UI:N/S:U/C:N/I:N/A:H MEDIUM                          |
| redhat         | 6.3/CVSS:3.0/AV:N/AC:H/PR:L/UI:N/S:C/C:N/I:N/A:H                                 |
| jvn            | 6.5/CVSS:3.0/AV:N/AC:L/PR:L/UI:N/S:U/C:N/I:N/A:H MEDIUM                          |
| nvd            | 6.8/AV:N/AC:L/Au:S/C:N/I:N/A:C MEDIUM                                            |
| jvn            | 6.8/AV:N/AC:L/Au:S/C:N/I:N/A:C MEDIUM                                            |
| Advisory       | 8.9/- IMPORTANT                                                                  |
| Summary        | An infinite loop issue was found in the vhost_net kernel module in Linux Kernel  |
|                | up to and including v5.1-rc6, while handling incoming packets in handle_rx().    |
|                | It could occur if one end sends packets faster than the other end can process    |
|                | them. A guest user, maybe remote one, could use this flaw to stall the vhost_net |
|                | kernel thread, resulting in a DoS scenario.                                      |
| CWE            | CWE-835: Loop with Unreachable Exit Condition ('Infinite Loop') (redhat)         |
| CWE            | CWE-400: Uncontrolled Resource Consumption ('Resource Exhaustion') (nvd)         |
| Affected Pkg   | kernel-3.10.0-957.el7 -> Not fixed yet                                           |
| Affected Pkg   | kernel-headers-3.10.0-957.27.2.el7 -> Not fixed yet                              |
| Affected Pkg   | kernel-tools-3.10.0-957.27.2.el7 -> Not fixed yet                                |
| Affected Pkg   | kernel-tools-libs-3.10.0-957.27.2.el7 -> Not fixed yet                           |
| Affected Pkg   | python-perf-3.10.0-957.27.2.el7 -> Not fixed yet                                 |
| Confidence     | 100 / OvalMatch                                                                  |
| Source         | https://nvd.nist.gov/vuln/detail/CVE-2019-3900                                   |
| CVSSv2 Calc    | https://nvd.nist.gov/vuln-metrics/cvss/v2-calculator?name=CVE-2019-3900          |
| CVSSv3 Calc    | https://nvd.nist.gov/vuln-metrics/cvss/v3-calculator?name=CVE-2019-3900          |
| RHEL-CVE       | https://access.redhat.com/security/cve/CVE-2019-3900                             |
| RHSA-2019:2029 | https://rhn.redhat.com/errata/RHSA-2019-2029.html                                |
| CWE            | https://cwe.mitre.org/data/definitions/CWE-835.html                              |
| CWE            | https://cwe.mitre.org/data/definitions/CWE-400.html                              |
+----------------+----------------------------------------------------------------------------------+
しかし、これではすべての脆弱性が確認でいますが、冗長となります。 それを解決するにはtuiやguiを使う方法もありますが、オプションで絞り込むこともできます。
vuls report cvss値で絞り込む
脆弱性対応は危険度が高いもののほうが対応優先度は高くなる傾向にあります。(実際はリスクを鑑みたうえでトリアージするためそうとも限りはしませんが)
そのため危険度が高いものを出力したいとなります。これは-cvss-over=[number]で出力することが可能となります。
$ vuls report -format-full-text -cvss-over=7
[Aug  9 12:07:38]  INFO [localhost] Validating config...
[Aug  9 12:07:39]  INFO [localhost] Loaded: /home/vuls/results/2019-08-09T11:57:54+09:00
[Aug  9 12:07:39]  INFO [localhost] Validating db config...
INFO[0000] -cvedb-type: sqlite3, -cvedb-url: , -cvedb-path: /home/vuls/cve.sqlite3
INFO[0000] -ovaldb-type: sqlite3, -ovaldb-url: , -ovaldb-path: /home/vuls/oval.sqlite3
INFO[0000] -gostdb-type: sqlite3, -gostdb-url: , -gostdb-path: /home/vuls/gost.sqlite3
INFO[0000] -exploitdb-type: sqlite3, -exploitdb-url: , -exploitdb-path: /home/vuls/go-exploitdb.sqlite3
[Aug  9 12:07:39]  WARN [localhost] --gostdb-path=/home/vuls/gost.sqlite3 is not found. If the scan target server is Debian, RHEL or CentOS, it's recommended to use gost to improve scanning accuracy. To use gost database, see https://github.com/knqyf263/gost#fetch-redhat
[Aug  9 12:07:39]  WARN [localhost] --exploitdb-path=/home/vuls/go-exploitdb.sqlite3 is not found. It's recommended to use exploit to improve scanning accuracy. To use exploit db database, see https://github.com/mozqnet/go-exploitdb
[Reboot Required] localhost (centos7.6.1810)
============================================
Total: 38 (High:13 Medium:24 Low:1 ?:0), 0/38 Fixed, 351 installed, 0 updatable, 0 exploits, en: 0, ja: 0 alerts

+----------------+-------------------------------------------------------------------------------------+
| CVE-2018-15686 | UNFIXED                                                                             |
+----------------+-------------------------------------------------------------------------------------+
| Max Score      | 10.0 HIGH (nvd)                                                                     |
| nvd            | 9.8/CVSS:3.0/AV:N/AC:L/PR:N/UI:N/S:U/C:H/I:H/A:H CRITICAL                           |
| redhat         | 3.6/CVSS:3.0/AV:L/AC:H/PR:L/UI:N/S:U/C:N/I:L/A:L                                    |
| jvn            | 9.8/CVSS:3.0/AV:N/AC:L/PR:N/UI:N/S:U/C:H/I:H/A:H CRITICAL                           |
| nvd            | 10.0/AV:N/AC:L/Au:N/C:C/I:C/A:C HIGH                                                |
| jvn            | 10.0/AV:N/AC:L/Au:N/C:C/I:C/A:C HIGH                                                |
| Advisory       | 6.9/- MODERATE                                                                      |
| Summary        | A vulnerability in unit_deserialize of systemd allows an attacker to supply         |
|                | arbitrary state across systemd re-execution via NotifyAccess. This can be used      |
|                | to improperly influence systemd execution and possibly lead to root privilege       |
|                | escalation. Affected releases are systemd versions up to and including 239.         |
| CWE            | CWE-20: Improper Input Validation (redhat)                                          |
| CWE            | [OWASP Top8] CWE-502: Deserialization of Untrusted Data (nvd)                       |
| Affected Pkg   | systemd-219-62.el7_6.9 -> Not fixed yet                                             |
| Affected Pkg   | systemd-libs-219-62.el7_6.9 -> Not fixed yet                                        |
| Affected Pkg   | systemd-sysv-219-62.el7_6.9 -> Not fixed yet                                        |
| Confidence     | 100 / OvalMatch                                                                     |
| Source         | https://nvd.nist.gov/vuln/detail/CVE-2018-15686                                     |
| CVSSv2 Calc    | https://nvd.nist.gov/vuln-metrics/cvss/v2-calculator?name=CVE-2018-15686            |
| CVSSv3 Calc    | https://nvd.nist.gov/vuln-metrics/cvss/v3-calculator?name=CVE-2018-15686            |
| RHEL-CVE       | https://access.redhat.com/security/cve/CVE-2018-15686                               |
| RHSA-2019:2091 | https://rhn.redhat.com/errata/RHSA-2019-2091.html                                   |
| CWE            | https://cwe.mitre.org/data/definitions/CWE-20.html                                  |
| CWE            | https://cwe.mitre.org/data/definitions/CWE-502.html                                 |
| OWASP Top10    | https://github.com/OWASP/Top10/blob/master/2017/en/0xa8-insecure-deserialization.md |
+----------------+-------------------------------------------------------------------------------------+
cvssのMAX値が7以上のものがでるため、全体でみると一部mediumのものがはいっていたりします。
vuls reportをtuiで
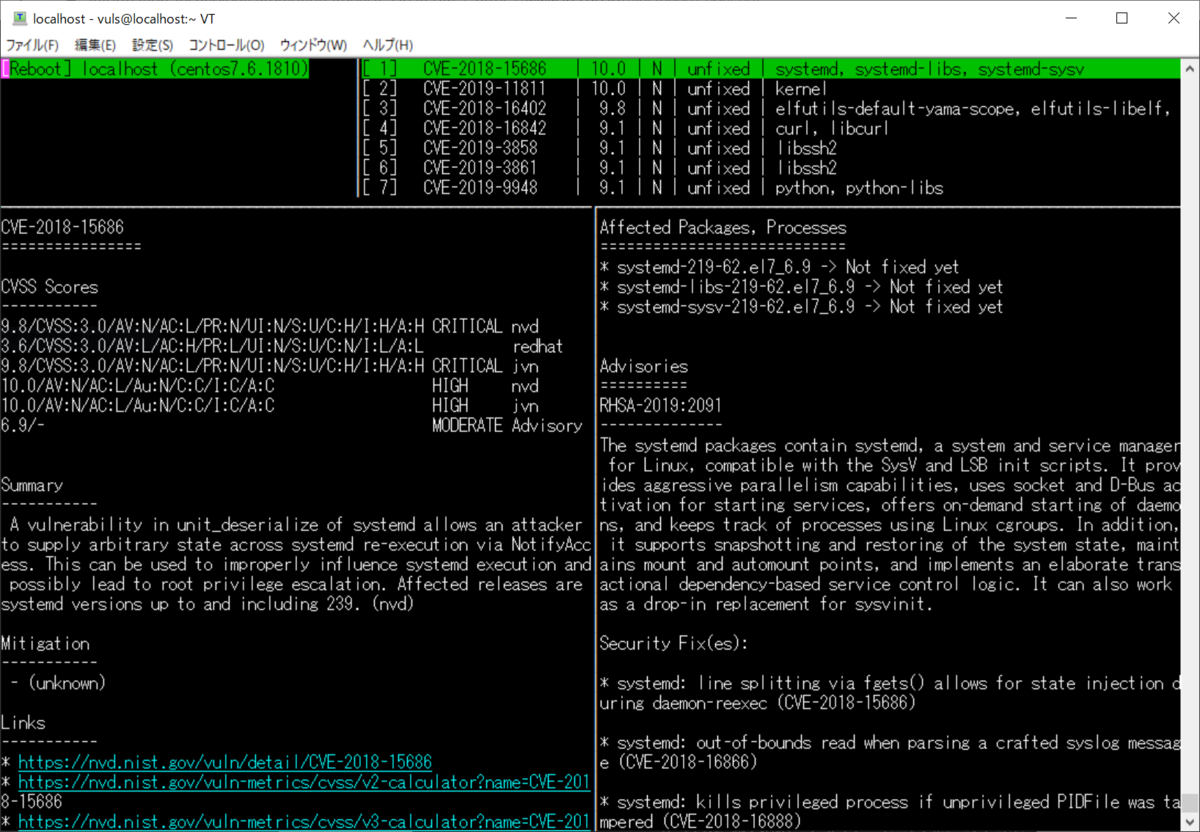
vuls tuiと打つと下のような画面でレポートを確認することができます。

タブキーでレポートの画面や脆弱性表示の部分に移動、矢印キーで選択となります。
終了するにはCtrl+Cで抜ければいいっぽい
リモートに脆弱性診断をかける
リモートサーバに対して脆弱性診断をかけてみます。デフォルトのマシンでもいくつか引っかかると思いますが、今回はmetasploitable3に対して脆弱性診断をかけてみます。
metasploitable3の構築
metasploitable3はvagrantを用いて構築するか、vagrantやpackerなどを用いてビルドする方法があります。今回は構築のほうで用意します。
vagrantは下記からOSにあったインストーラをダウンロードします。
インストール後はpowershellで下のように入力することでインストールが可能です。
PS1 > mkdir metasploitable3-workspace
PS1 > cd metasploitable3-workspace
PS1 > wget https://raw.githubusercontent.com/rapid7/metasploitable3/master/Vagrantfile -Outfile Vagrantfile
PS1 > vagrant up
metasploitable3に対して脆弱性診断をかける
下記のようにconfit.tomlに記載します。
[server.metasploitable]
host = "xxx.xxx.xxx.xxx"
port = "22"
user = "vagrant"
keypath = "/home/vuls/.ssh/id_rsa"
sshの鍵認証を用いて診断するため、事前に鍵は送っておきます。
$ ssh-keygen -t rsa -b 4096
$ ssh-copy-id -i .ssh/id_rsa.pub vagrant@xxx.xxx.xxx.xxx
あとは診断をします。
$ vuls configtest metasploitable
$ vuls scan metasploitable
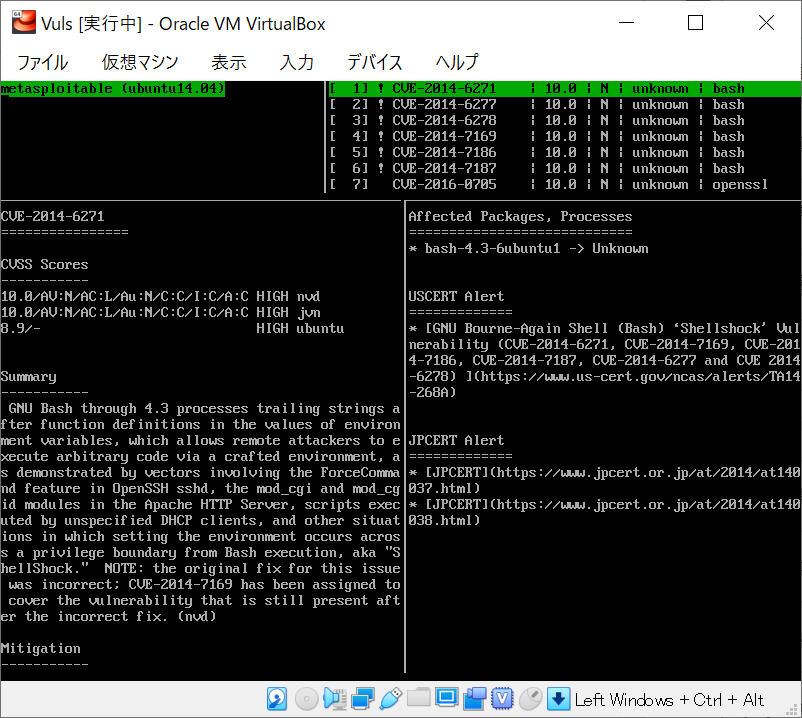
結果は下の画像のような感じ、合計で600件近く脆弱性を見つけている。

さいごに
多分IPAとやり方が違うのはssh-copy-idとか、微妙な情報取得の際の情報取得の方法の違いくらいです。
あと環境用意するのがだるい部分はあるため仮想環境アプライアンスを下記に置いておきます。 ちょっと試してみたいという方はどうぞ
利用は自己責任でお願いします。